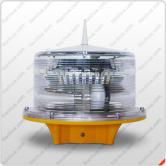
Solar Aviation Obstruction Light Nanhua LT810A
Obstruction light for a wide variety of cranes used in Harbors, Metallurgies, Towers (Telecom, GSM), Smokestacks, Buildings and any other potentially hazardous obstructions to air traffic with a steady burning red safety light.
Specifications
| Description | Parameter |
|---|---|
| Applications | Obstruction light for a wide variety of cranes used in Harbors, Metallurgies, Towers (Telecom, GSM), Smokestacks, Buildings and any other potentially hazardous obstructions to air traffic with a steady burning red safety light. |
| International standard | ICAO(Annex 14) low intensity aviation light and FAA-L810 |
| Light source | LED |
| Light color | red |
| Vertical degree | ≥10° |
| Horizontal degree | 360° |
| Intensity | >32.5cd |
| Flashing rate | 20 or 30 or 40times/min(adjustable) Default rate:30times/min |
| Led life | ≥100.000h |
| On/off lever | 70/100Lux |
| Battery capacity | 3.6V/8AH NiMH |
| Solar panel | 4W/5V |
| Autonomy | 7 days(at 25℃, if the temperature is lower than 0℃ or above 40℃, it will affect the battery discharge) |
| Operating temperature | -40℃~+55℃ |
| Relative humidity | 10%~95% |
| IP protection | IP65 |
| Weight | 5Kg |
| Material | Base: Die casting aluminum Housing: PC |
Functions & Features
-
Extremely Reliable — Major Maintenance Cost Saving.
-
Corrosion resistance and durability.
-
Use NiMH battery, easy to replace.
-
Lamp housing –Polycarbonate, with good anti-impact strength, thermal stability, high transmittance.
-
Combustibility rating: UL94-V0 .
Installation and Operation
-
Mount the solar light in the most suitable place such as under direct sunlight, to ensure its continuous operation.
-
Use 3 M8 screws to fasten to the mounting surface, and the surface should leveling and with enough mechanical strength.
-
If operate the light for the first time, open the battery button on the bottom of light base.
-
As the light has built in photocell, in case the light beam is very strong, the light will not work,when test the light, put the light in dark place.
Flashing Rate Adjustment
-
Unscrew the fixing 6 screws.
-
Disconnect the battery connection, take off the housing.
-
Adjust the red switch on the PCB board, and adjust the flashing rate.
Battery Replacement
-
Open the battery cover on the bottom.
-
Take off the battery.
-
Replace to the new battery and install the cover.


